Internet Pool Site Manager
The Pool Site Manager allows you to manage the pool webpages on your server without using a separate FTP program. While it is quite simple, it provides enough functionality to upload, download and delete files on your server etc.
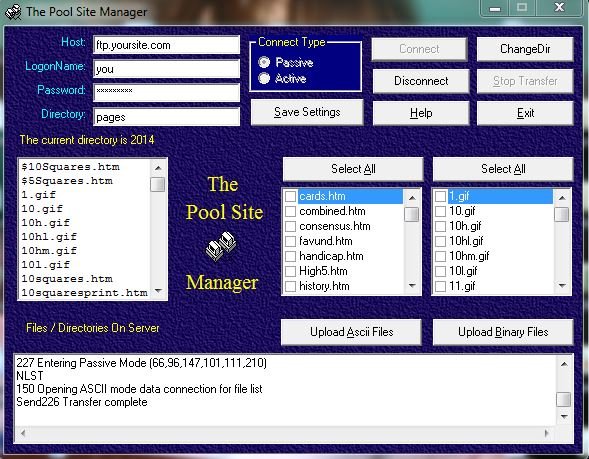
NOTE: Please read the Tips section at the bottom of this page.
AOL Users: Please read the AOL User's section at the bottom of this page.
Following is a step-by-step tutorial that provides a helpful start with the Pool Site Manager.
1) When the Pool Site Manager opens up, all the pool webpage files will be in the two upload listboxes. The left listbox contains all the webpages you created
in the Web Page Manager, the music files and javascript files, and the right listbox contains all the Web graphics, Java files, and music/sound files supplied with the NFLPM.
2) In the HOST textbox, type the ftp name of your Internet provider. Usually, this is ftp.yourdomain.com.
3) Type your username and password and if you know the directory where you are located, you can fill that in also.
4) Click on the CONNECT button. The server lisbox should soon start filling up with the server's file and directory listings.
5) Changing Directories: There are three ways to navigate directories on your server. 1) Fill in the directory name in the Directory listbox and click the ChangeDir button 2)
Double-click on the directory name in the Server listbox. 3) Click on the directory name, and then right-click the mouse. Choose "Change Directory" from the pop-up menu.
6) After you are in the correct server directory, it is time to upload your pool web files. Simply check the files you want to upload, and click the upload button.
7) If you want to store the Host, Logon Name, and Password information, click the "Save Settings" button.
TIPS:
You only need upload the Graphic and Java files once, since they will not change from week to week. ny files in your Webpages directory that have an .htm, .html, js,
or rpm extension will be included in the HTML upload listbox. Any Binary files with a .gif, .jpg, .class, .mid, jaror rm extension will be included
in the Binary file upload listbox. No other file extensions will be included. There will be no files in the HTML upload box until you either create some in the Web Page Manager or copy
some from another directory into the Webpages directory. If you are uploading or downloading a large file, you can minimize the Pool Site Manager and perform other tasks in the
pool while the file is being transferred.
HOW-TO'S:
To Download a file from your server: Either double-click the file in the server listbox, or click on the file, right-click your mouse, and choose "Download File". It will
be placed in the \Webpages directory.
To Delete a file from your server: Click on the file, right-click your mouse, and choose "Delete File From Server".
To Go Up one Directory: Click on any file or directory in the server listbox, right-click your mouse, and choose "Go Up One Directory". Or, you can type " ../ " (without the quotes) in the
directory textbox and then click the ChDir button.
If you are having trouble connecting: Click on the Disconnect button. Change the connect type from Passive to Active, or vice-versa, and try to re-connect again. If you still
cannot connect, then you are behind a firewall that the FTP client cannot navigate through. The FTP client is built to navigate through most, not all, corporate firewalls.